Editing Rebuilt – with FCPx
Jovan | September 29, 2011
Having edited on all the versions of FCP for eleven years I was so excited by this year’s great leap forward and bought my download on release day.
Sneak previews looked amazing, and the promise of new tools and easier ingest for solid state cameras had me chucking my cash towards Cupertino with the faith that it would unquestionably be an advance in video post.
This is no meagre upgrade, Apple are trying to develop the practices of editing. They’ve hidden away confusing stuff to prevent you from making dumb user errors like moving audio out of sync. And there’s new stuff, lots of original features to make our workflow simpler.
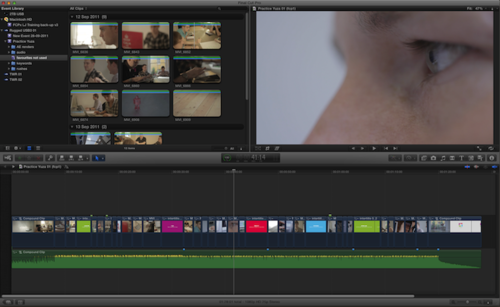
The interface is superb. Entirely redesigned, working well on either single or dual-monitor workstations. I’m running last year’s 17” MBP and 23” Cinema Display and the various palettes and windows fit together very naturally. Stuff like the Property Inspector moves out of the way neatly when you don’t need it, and feels just right when it’s open. Video scopes and audio meters look awesome and have great detail. There’s just the one video display which soon feels natural. This really surprised me as Viewer/Canvas is one of those core concepts that all video editing is based around.
Features added to FCPx include the tagging of keywords familiar from iPhoto. It works effortlessly and makes your initial edit prep more powerful, with the ability to make smart collections from keywords, so for example all your exteriors would be easy to find, or all your graphics. Media can be rated as ‘good’ or ‘reject’, then a filter toggled on/off to show you only what you’ve decided is worth editing. This is great and something I’ve done manually for years, cutting my rushes and lifting the good stuff to V2. Anything that’s left on V1 I know I’ve decided to reject. I’d say this is evidence that Apple have worked with editors to introduce tools that aid workflow.
There’s a new trim tool which incorporates all of slip / slide / ripple / roll. It’s really intuitive to use and a well designed improvement. Markers have also been developed with a new To Do function, which can then be ticked off as Done. These are accessible from a Timeline Index which is searchable and has filters. This is useful if you’re doing some editing, notice something that needs attention later, make it a To Do marker, and at some point you’d go through your To Dos and tick them off, love it.
This week I ran a test exercise re-cutting a promo that I made last week in FCPclassic. I wanted to see how different it felt to use X, what was easier, and what if anything was harder to achieve. When I output the result using the new Share / Apple Devices / iPad option I’m pleased to say the video looked just as good. In fact on one fade from black shot there was noticeably less banding. Previous FCP output settings are a locked down AppleTV preset, whereas now you can go in and configure parameters. There’s also dedicated sharing options for Vimeo, Youtube and Facebook. I tested the Vimeo preset and the results are decent at fullscreen HD, so the route from timeline to global distribution is simplified. Outputing, (sorry ‘Sharing’ as Apple have renamed it) at the highest available resolution is ProRes4444 which looks great fullscreen on 23” Cinema Display and the file size I acheived was 1gb as opposed to 7gb using Animation codec from FCPclassic, so perhaps this could be considered this as a suitable mastering format?
I’m being open-minded in the leap from classic to X, and hopefully you can see above that there are improvements. I don’t want to join the camp of naysayers who reacted straight out of the gate slagging this version off entirely. However after one exercise of cutting with it I can see some major flaws. One huge issue being the incompatibility between X and classic. You simply cannot open a legacy project file, and of course an X project can’t be opened in classic. I’ve maintained an archive of all my FCP work since day one and it all opens in FCP7. in the future I will always need a copy of the classic and the new software on my system. Imagine not being able to open an After Effects project from five years ago in the latest CS5 version you just bought, this is daft.
Apple are trying to change the whole video post paradigm I feel, which might be why they’re renaming things that are essentially the same (Timeline = Storyline / Nested Sequence = Compound Clip / Grading = Color Adjustment). Your project now only contains one sequence, if you want more sequences – perhaps an alternate cut – then you make a new project altogether. This sucks I’m afraid. Much of my work has been on productions leading to a main edit and a series of standalone talking head packages. These naturally work as different sequences contained within one project. You hand back to your client the final project file containing every edit decision, neat and tidy. Now you’ll be handing back a bunch of project files. I guess archiving our work just got a whole lot messier.
Tracks are the basis of all editing software. Not just video, but audio and motion graphics too. I guess Apple think tracks are a bit daunting for the amateur home user, a bit complicated. So they’ve done away with them in FCPx. In my opinion this makes it hard to manually organise your timeline. I kind of think in horizontal visual streams. The one on the bottom that’s the main shots right? Then above it cutaways, above that overlay graphics to composite etc. It works, you can lock them. No more, it’s a primary storyline (think V1) and connected clips. I’ll reserve judgement until I tackle a difficult assembly but from my work so far I’m not a fan.
Did you hear the one about ‘Save’? You know, command-S, you’ve worn keyboards out over the years with that thumb and forefinger shortcut. I can’t remember when Apple gave us the Autosave Vault, but I’m glad they did. I could stop saving manually and keep a whole folder of versions across time to revert back to, sweet. Never lost any work since. FCPx also autosaves for you. In fact it’s so automatic that there is no such thing as ‘Save‘ anymore, look in the File Menu it’s gone. But what FCPx does not have is an Autosave Vault of versions, all you get is the very latest. In practice – and I’ve only cut one edit so far – when I quit the app it lost my last hour of editing for some reason. When reopened the next day loads of editing had disappeared and there’s no vault of time-staggered versions to revert to. This is bad. A workaround could be to save your project file to the Mac rather than an external drive and use Time Machine to dig out old copies. Except that FCPx forces you to render files to the same drive as the project file, you cannot manually tell it where to send stuff, so if your rushes and the whole project assets are on an external drive then your renders won’t be in the same place.
Final Cut was never a single solution to video post. I have always spent my time flitting between it and After Effects and Soundtrack Pro. Sending little bits of media to other apps for working on, then importing a rendered result to go into the FCP timeline. Not no more. FCPx has one output (sorry ‘Share’) and that is THE WHOLE TIMELINE. It is impossible to render out individual assets or between a range defined by In/Out. This one is pretty much a deal-breaker as so much of my work goes through AE at some point. You can make a framegrabbed still from the timeline, although it’s time for a cup of tea as this takes ages to render out.
My whole blog came about because of the DSLR revolution in shooting video. Final Cut was never built for these new cameras, so the promise of background transcoding upon ingest while you edit really attracted me to FCPx. The feature does work, but performance is rubbish. The keyboard and mouse become unresponsive as you see your processors being sucked into transcoding duties. Next time I cut DSLR footage on FCPx I’d ingest the day before the edit, let it transcode overnight and get to cutting when all background processes are complete. I’m running last year’s MBP with core i7 and 8gb of ram, so would expect the hardware to be able to handle the task. In fact the old way of transcoding in MPEGstreamclip could be done while cutting in FCPclassic so I’m afraid this is a step backwards. Also worth noting is that three of a batch of 120 clips failed to ingest in FCPx so I had to do them in MPEGstreamclip, which had no problem.
As with many DSLR shooters I’ve been working dual-system, recording audio to a separate device. I was syncing manually using clapper slates for reference until I came across Pluraleyes which takes all the pain away and does it for you. At the time of writing Singular Software have not released Pluraleyes for FCPx, so it’s back to manual. There is a Synchronize Clips function within FCPx but it’s based on markers or in-points as opposed to being automatically calculated from the waveforms.
Doing simple audio tasks like a fade is now easier in the FCPx storyline, there’s a handle always present to be dragged making an auto curve. This takes a couple of clicks away from the old toolset which is good. However one simple audio task which an editor does frequently of course is to add a cross fade transition between two adjoining clips. For example a series of vox pops, if you don’t cross fade there’s a horrible little digital click on the cut. To cross fade in FCPx you have got to detach the audio and video which are seen as one asset in the timeline. Then select the two audio clips and make them into a compound clip, open that then add your cross dissolve. This is so convoluted for something an editor’s doing all the time, hopefully it can be fixed in future updates.
FCPx does not communicate with the other pro apps from Final Cut Studio. When it comes to grading you’re now limited to the internal toolset, you cannot send to Color. So Apple have reinvented the wheel yet again, this time the colour wheel. An industry standard has been done away with. The new tool feels ok to use though I’d say there’s no room for precision as everything is done by dragging dots around a graph. This results in numerical values, but you can’t edit those numbers for fine control. There’s no buttons to nudge values in small increments either. For example I’ll often crush greys ever so slightly using the FCPclassic colour wheel sliders which have a triangle for 1% increments. Now it’s a bit like finger painting, there’s no granularity to your control.
The white balance pipette has gone too which is a real shame as that often gives a good starting point for a primary grade. What we do have are a load of pre-baked looks to chose from though. Every cat-playing-a-piano video can now have one of the FCPx pre-defined grades at a click. Wether they’ll be white balanced is another matter.
The Match Color tool looks interesting – make one shot have the same chrominance and luminance characteristic as another. However having tried to use it I’d say the results are universally rubbish and I wouldn’t bother. If you want to try it you can’t miss it, the icon is a multicoloured wand complete with sparkles! I’m a pro, I’ve got pro gear, I charge for my services, this is my career. Don’t make me use a multicoloured wand, it’s one small step away from dancing paperclips.
Exporting the finished edit is limited to a handful of the common codecs, but crucially Animation isn’t one of them. I’m not an animator but have been mastering to that codec for years as it has always given the greatest visual quality. Yes the file is massive but from that one perfect master you can happily compress all the versions your client demands. Crucially it’s a cross platform codec so I can give the Quicktime to Mr.PC who can use it too. I doubt he’ll be able to open AppleProRes4444 anytime soon. I find that exporting really bogs down all the cores on my processor and trying to use the Mac for other tasks simultaneously causes spinning beachballs and another cup of tea.
My overall feeling is that Apple are taking away options, forcing an editor into one way to work. You cannot decide which root folder to send your files to, only which drive. It’s as if we’re too stupid to make that decision so Apple are protecting us from mucking things up. It feels like being guided by an autopilot rather than having manual control, and just like using a camera we like manual control, right?
So I’m going to continue editing with FCPclassic for a while, monitoring the updates for X. If Apple address the biggest issues which many editors are complaining about then it’s gonna be a great environment to work in.
Up next
How can I get a higher ROI from my video?
Discover how to maximise your corporate video investment for greater ROI in our latest blog. Learn practical tips and strategies to extend the reach and effectiveness of your video content beyond just your website. Understand why smart distribution and creative usage can make your corporate videos a powerful tool for business growth.
If you've never worked on a video production before, find out more about the production process
Learn more